In previous parts, we developed the Admin section to manage the Menu, User Messages, and Pages. In this part, we will secure the Admin section by implementing the login functionality. On the client-side, we will learn how to implement the Angular Guard, JSON Web Token (JWT) and browser local storage. On the server-side, we will use bcrypt to compare the hash password, JSON web token to create the public key and embed into the login API response.
Introduction
In previous parts, we developed the Admin section and it is open for everyone that is definitely not safe because everybody can mess up with the Menu, User and Page management, dah!. We need to secure the admin section and for that, we are going to implement the login functionality. For this application, we are assuming to have only one admin so we will keep the admin user and password in the config file (environment.json), but you are free to store them in the database for multiple users, we will also use the JSON Web Token(JWT) to keep the trusted relationship between client and server (as an anti-forgery token to avoid CSRF). The password would be stored as a hash string in the config file instead of plain string to add one more layer of security, we will use an online tool to hash the password.
Let’s Start
It is strongly recommended to read all previous parts before moving to this one, I can’t promise you would understand all the steps I am going to list down without knowledge of previous parts.
- Please compile and run the Part 9 and make sure the application is working fine, if there is an issue, you can verify the steps or comment at the end, I would love to help to resolve any problem you are facing.
- First, we will go to node.js server side and install two packages to create the Login API.
- bcryptjs: The bcryptjs is password hashing package, this is a one-way hashing algorithm we will use to hash the input password and compare it with already stored hashed password in the config file. Right click on the server, select the option, Open in Terminal and run the command in TERMINAL tab:
npm install bcryptjs --save - jsonwebtoken: This package will take the already stored private key and create the public key called a token. We will embed this token with Login API response to the client and the client would send it back to the server with all secured APIs request. The server will make sure the public key is the right one and the client is trusted to avoid CSRF. In the already opened server TERMINAL, run the command:
npm install jsonwebtoken --save
- bcryptjs: The bcryptjs is password hashing package, this is a one-way hashing algorithm we will use to hash the input password and compare it with already stored hashed password in the config file. Right click on the server, select the option, Open in Terminal and run the command in TERMINAL tab:
- For JSON Web Token(JWT), we need the private key, you can add any random string for that but I like to generate it through the tool, you can visit https://passwordsgenerator.net/ to generate the complex key, I selected the 64 characters long with first 7 checkboxes checked. Go to the server -> config -> database.js and replace its content with the following code that contains the secret key, you can create a separate file as well to store the key:
- Let’s go to environment.json and check our admin username and password, you probably should already have it if you are following my article series. Edit the server -> environment.json and check you have
USRandPWkeys:
- You can replace the
USRwith your email address and forPWkey as I mentioned in the introduction we will save the hashed password so that the user can’t see and guess it. You can go to https://bcrypt-generator.com/ website and in the Encrypt section, enter your desired password and click the Hash! button. Copy the result from the top green alert inPWthe key’s value. For now, I am keeping the password “fullstackhub“, generating the hashcode for it and saving it in environment.jsonPWkey’s value. - Next, we will create the User model class to hold the username and password. Right click on a server -> models and select the option New File, specify the name userMdl.js and add following code in it:
- On the top, we are creating the User schema that will create a users collection in the database but we will not be using it for now because username and password would be read from environment.json. We are just creating the collection for the future in case you decide to use it.
- We have two methods
getUserByUsername()that is comparing the input username from client to already saved username asUSRkey in an environment.json file, thecomparePassword()a function is taking the plain password (in our case “fullstackhub“), generating the hash string and comparing it with already saved password asPWkey in environment.json. - Next, create the login API, right click on the server -> routes folder and select the option, New File, enter the file name user.js and hit the enter key. Add the following code in it:
- In the above file, we have only one login API that is receiving the username and password from the client:
- First, we are calling the
getUserByUsername()function from userMdl.js, verifying that username is the same as in an enviornment.json file, if not, immediately returning the error response Invalid Email Address!. - If the username does match, the control is calling the
comparePassword()function from userMdl.js to verify the password against enviroment.json passsword. Just a reminder, the user will enter (in our case, “fullstackhub“) that will be hashed and compared throughbcrypt.compare()method. - If both username and password do match, we are creating the
dataobject having username and password. Thisdataobject alongsecretkey defined in database.js are passed as arguments tojwt.sign()method to create the public key (token). This token is returning back with a successful response where it would be stored in localStorage on the client side.
- First, we are calling the
- The last step on the server side is to add the login API route in a mazharnco.js file. Right click on the server -> mazharnco.js file and replace its content with the following:
- Run the server application by
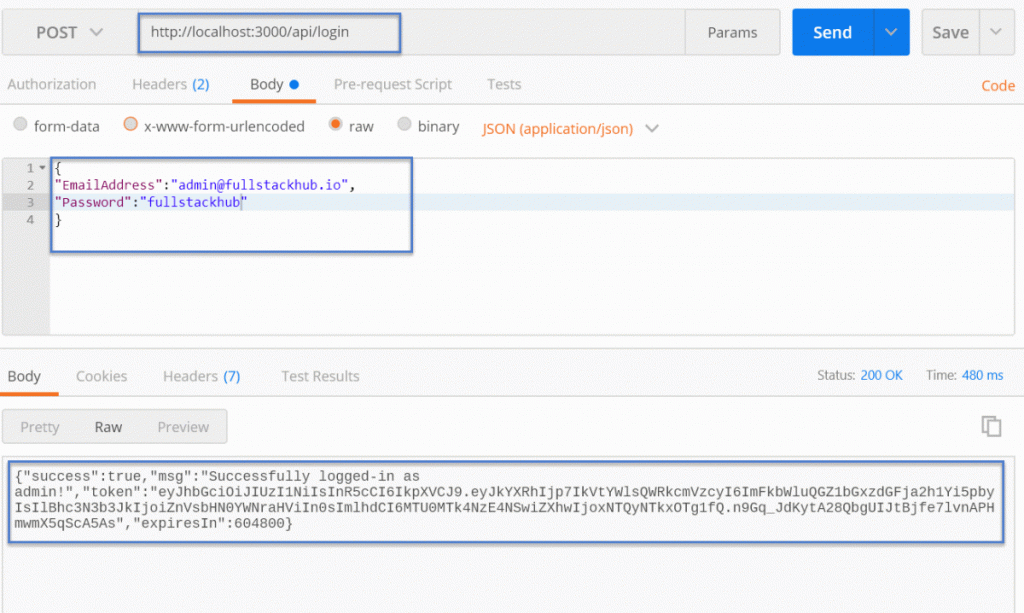
pm2 start environment.json --env developmentcommand, go to Postman and make the following API call, you should get successful response and token:


