I recently implemented an application using Jason Taylor Clean Architecture with a .NET Core article and thought it would be a good idea to write another article to break it down into steps so that it would be easy to follow for beginners. Obisvoulsy, there would be some differences e.g. I will be using Dapper micro ORM, repository, and unit of work design pattern instead of Entity Framework .NET Core and will use a separate database for integration testing instead of an in-memory database and also if time permits, I will add more detailed Angular unit and integration tests.
We are going to develop one of a favorite application called User Management where you would be able to add, update, delete and view the users, currently, I am going to skip user authentication, you can find it in Jason’s Github repository.
Let’s Start
Before developing the actual solution, first, install the prerequisite software and verify them.
- Download the Visual Studio Community 2019 and install it.
- Download the Node.js and install it. Run the
node --versioncommand in the command line and check the version should be greater than 12.X.X. - Open the command line and run the command:
npm install -g @angular/clirun the commandng --versionto verify the version should be 10.X.X. - Install the SQL Server Management Studio and SQL Server.
That’s pretty much it, let’s start the development, open Visual Studio 2019, and create a new ASP.NET Core API project. Select the Project Name UserManagement.API and Solution Name UserManagement and .NET Core 3.1 with Angular template. Uncheck the Configure for HTTPS for now.
Write click on Solution ‘UserManagement’ and select Add -> New Solution Folder and create two folders src and test to organize the projects and drag the UserManagement.API to the src folder. Build and run the project, you should see the default page with some weather Forcast page.
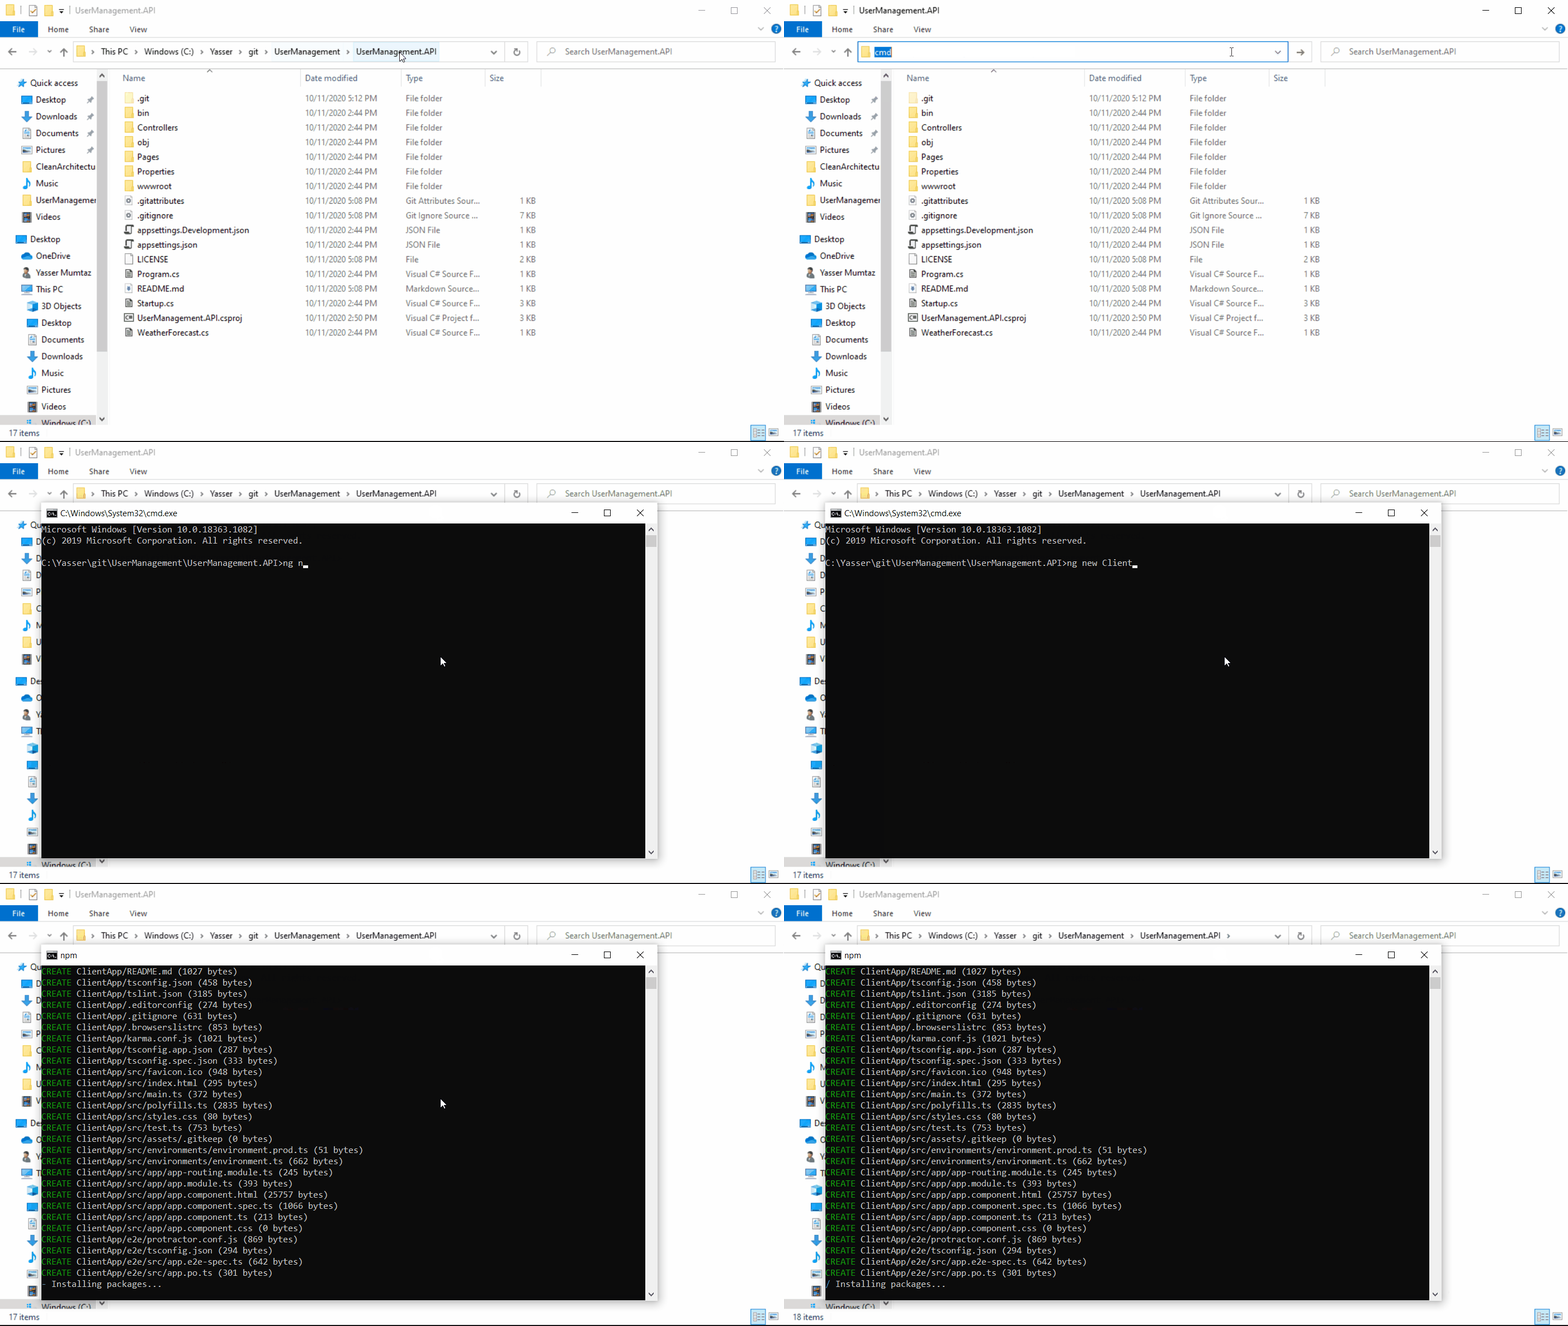
The default Angular template that comes with Visual Studio 2019 is of 8.X.X version, let’s update it to 10.X.X version, delete the folder ClientApp from UserManagement.API project and open the command line point to UserManagment.API folder path. Run the command ng new ClientApp.

Once ClientApp is ready, just run the ASP.NET Core API solution and you should see the different home page that is Angular 10 default page. View the ClientApp -> package.json file and you would see core packages are now of 10.X.X version.
First, we will develop the backend API and other projects e.g. Application for business logic, Domain for defining database entities, and Persistence for DB logic. As stated in summary, we will follow the same architecture and pretty much the same code as Jason’s clean architecture application but will try to understand it step by step.
Backend Development Projects Introduction
There would be four projects in the main solutions along with one unit and two integration test projects.
UserManagement.API
An ASP.NET Core API solution where we will create a User Management controller and GET, PUT, DELETE, and POST APIs. The APIs will talk to UserManagement.Application project through MediatR package following CQRS (command query responsibility segregation) principle.
Without digging into Mediator pattern implementation, the only thing to remember is that it creates a loosely coupled architecture that is easy to manage and test.
The CQRS states that commands e.g. add, update, and delete should be separate for the get queries. So we will create separate command classes to add, update, delete user, and query classes to get all users or get the user by id.
We will also use integrate Swagger API for API documentation that will help us to run/perform black-box testing for the APIs before implementing the front end application.
UserManagement.Application
The Application project will have actual business logic, the commands, and query classes that the API project will call to manage the user. The Application project will talk to the user repository from Domain and Persistence project to get, update, delete, and add the user in the database. I am also taking code from Jason’s article to centrally manage the exception and logging functionality along with fluent validation to validate the model class.
Write click on the src folder and create a new Class Library (.NET Standard) with C#. Enter the name UserManagement.Application and click on the Create button. Remove the default Class1.cs file.
UserManagement.Domain
Domain project will contain all database entities, in our case only one entity User. We will also define the Repository and Unit of Work interfaces here since the Application project won’t have direct access to the Persistence project. This will give us the freedom to mock the user repository for unit testing.
Write click on the src folder and create a new Class Library (.NET Standard) with C#. Enter the name UserManagement.Domain and click on the Create button. Remove the default Class1.cs file.
UserManagement.Persistence
This project will be responsible to implement the User repository to do database transactions and query i.e. add, update, delete, and get user records.
Write click on the src folder and create a new Class Library (.NET Standard) with C#. Enter the name UserManagement.Persistence and click on the Create button. Remove the default Class1.cs file.
UserMangement.API.IntegrationTests
This project will contain the Integration tests for UserManagement.API project. We will mock the API client, pass the JSON payload to actual User APIs, and get back the HTTP response result where we will verify the HTTP response code and content. We will use the test database for database transactions.
UserManagement.Application.UnitTests
We will develop business unit tests in this project where will mock the User repository and focus on actual business logic testing.
UserManagement.Persistance.IntegrationTests
We will write integration tests to check the User repository functions e.g. Add, Update, Delete, and Get. We will use the test database for database transactions.
Let’s start the development in the next part.


Salam Yasir, When i created the API project and after that when i created Angular project and run the solution it is not opening Angular project instead open swagger,can you please tell me what thing went wrong at my end
THANK YOU ,YOU DID A GREATE JOB IT IS HELPFULL AND INFORMATIVE ARTICLE GOD BLESS YOU IN SHAA ALLAH