


In this part, we will create MongoDB database, the contact us page model in the server-side (Node.js), save the user message information into the database and send an email to the website admin with a user message and contact information. This would be the start of our journey to actually create the dynamic website.
Introduction
So in the previous part, we developed node.js server-side code to send the user message through an email to admin. In this part, we will also save this message in the database. We will create the MongoDB database and Contact model class to hold the message attributes along with validation rules.
Let’s Start
- First thing, let’s install the mongoose, a famous Object Data Modeling (Mongoose provides a straight-forward, schema-based solution to model your application data. It includes built-in typecasting, validation, query building, business logic hooks and more, out of the box.)
- Drag the bottom blue ribbon and go to the TERMINAL tab (or select menu view -> Integrated Terminal). Enter the command
cd serverto go to a server project. After that, enter the commandnpm i mongoose --save. - Give some time to mongoose package installation and wait for a successful message.
- If you have don’t have the previous part’s code, you can download or clone it from here. Once the code is downloaded, make sure it is compilable and running fine before moving to the next step.
- Next, we will update the Contact model that will contain all properties i.e. Name, Phone, Email Address and Message and their validation rules.
- Edit the models -> contactModel.js and replace its content with the following:
JS
- So the email code snippet is the same as the previous part, the update is the
ContactSchemathat is a model we are creating through the mongoose library. You can see we are specifying the data type and validation rule i.e. all fields are required. - Since we updated the Contact model class, let’s update the route to save the contact information into the database where previously it was only sending an email to admin.
- Edit the routes -> contact.js file and replace its content with follows:
JS
- In the above code snippet, we created the HTTP Post request with the path as contact, The next parameter is a callback function where we are saving the contact information in the database and in database save’s callback method, we are sending an email to the admin.
- In the Contact save method, we are creating a Contact object and assigning the value from the request object that is being sent from the client-side and then calling the save method from mongoose model schema. Remember, we are creating a mongoose model in a contactMdl.js file and exporting it as a module. Here, in the fourth line from the top, we are adding the reference of contactMdl.
- The next step is to install MongoDB, help yourself to download and install the appropriate version from here.
- I am quite lazy so I like GUI for MongoDB, you can use anyone but I would go for Robo 3T (formel Robomongo), download and install it from here. It’s quite self-explanatory. Run the Robo 3T, go to File -> Connect, select Create a link from the opening window and follow the instructions. Create a reasonable connection name e.g. fullstackhub. Once the connection is created, you are all set, by default the connection listens on 27017 that can be updated too, but for now, let’s keep the default one.
- Cool, next let’s create a database connection in our node.js server application, create a new folder config in the server folder. In the config folder, create a database.js file and add the following code in it:
JS
- Once we will create the database connection in the application and run it the first time, it will automatically create a mazharncoweb database, you can keep whatever name you are comfortable with.
- The next step is to add the newly created database.js file reference in our starter file mazharnco.js and connect to the MongoDB through the above-given connection string.
- Edit the mazharnco.js file in the root server folder and update it as follows:
JS
- So in the above file, we added the mongoose library and newly created database config file reference. next, we are using the mongoose
connectmethod to connect to MongoDB by specifying config.database variable from config file i.e.mongodb://127.0.0.1:27017/mazharncoweb. - In
app.use("/api", contacts);statement, we are appending API with contact route. So the final contact Post request would be http://localhost:3000/api/contact - Before running the application, make sure you provided Admin email and password in environment.json file in the server folder:
JSON
- That’s pretty much it for this part, now, right-click on server folder and select option Open in Terminal. In the Terminal window run the command:
pm2 start environment.json --env development. - Right-click on mazharncoweb folder and select option Open in Terminal. In the Terminal window run the command:
ng serve -o - Wait until web application is opened in your default browser, go to Contact Us page, fill all information in the contact form and hit the Send Message button. You should receive a successful message after a few moments. Go to Robo 3T client, a new database should be created with the name mazharncoweb, right-click on it and select option Refresh. Go to Collections, you would see the only contact collection with your newly created contact record.
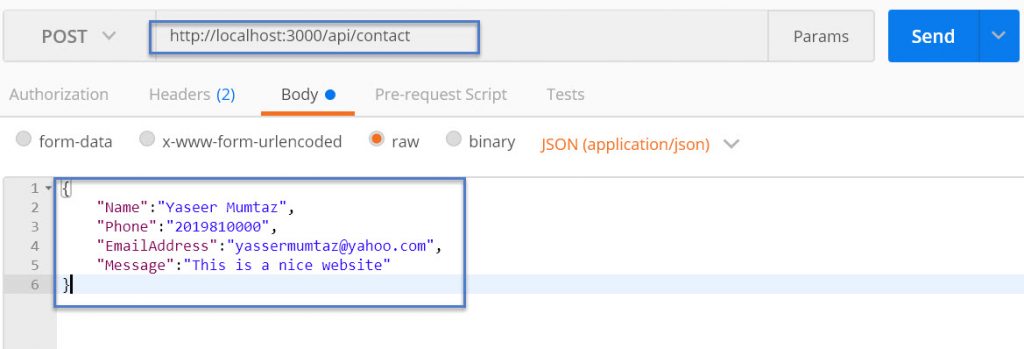
- Feel free to test API http://localhost:3000/api/contact in Postman (make sure your server node.js application is up and running):
- Let me know if you have any issues and suggestions for improvement. We will keep moving forward to create an admin section where we can dynamically create menu items, pages, read the messages, etc.